Happy 4/20, and welcome to the highly anticipated newsletter where we guide AI to make English letters.
I bet y’all didn’t know I was chill like that. Yes, AI nerds smoke weed too AHAHA.
Anyway, let’s pack your brain bowl with some AI nugs. This is some mind-boggling shit.
Last weed reference here… This next sentence is super dense but breaks apart nicely once you dissect it.
In this newsletter, we’ll use the Automatic1111 user interface with the Stable Diffusion AI model equipped with the ControlNet extension to show the AI what letters to use via ControlNet’s Scribble function.
You don’t need to understand what that sentence means right now. However, for those of you that decide to be on the cutting edge and learn this stuff hands-on, you’ll understand what it means a week from now.
And for the record… Those of you that actually do this tutorial will be on the absolute bleeding edge of AI images. Aside from being part of the research and development of the companies putting the models out, there’s nothing more advanced than this right now.
Don’t miss this chance to be a pioneer of this space. Do this shit. If you spend a year dedicating yourself to this AI stuff, you can’t comprehend the opportunities that will come to you.
Ok let’s proceed.
And if you find this tutorial helpful, help your friends stay up to date too. Share this Newsletter!
ControlNet Scribble
Today, we’re talking about ControlNet’s Scribble.
The Scribble function allows you to give AI a shape/logo/letter base image.
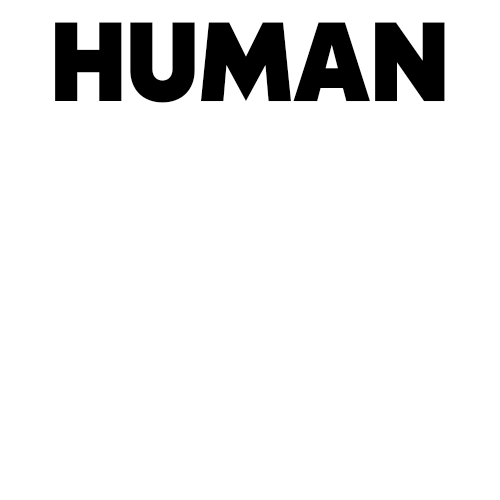
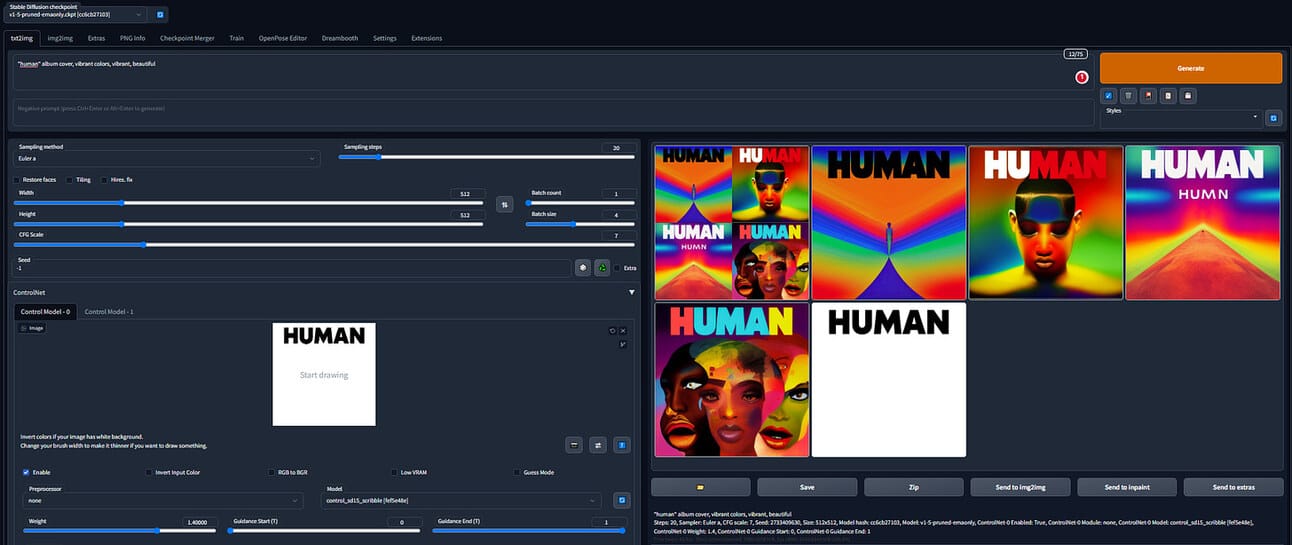
In the example you most likely saw on my Instagram, I gave ControlNet a black and white image of the word HUMAN and gave it the text prompt: “Human” album cover


There are two ways to start using text & images using ControlNet
There’s a free web tool you can use here, however, I’ve found it’s usually not working because it’s too overcrowded. I recommend that you start with the web tool if it’s working.

Unfortunately, this tool wasn’t working for me, but I’m a nerd with a decent graphics card (GPU), so I went the extra steps and downloaded Automatic1111, a totally free piece of software that gives you unfettered access to just about any AI image tool you want.
Downloading & Using Automatic1111 with ControlNet(HIGHLY RECOMMENDED)
Downloading Automatic1111 puts you in the 1% of the 1% of people in AI.
While the tools within Automatic1111 may not always give you as good of an image as Midjourney, Automatic1111 gives you more control over the composition of the images. Plus, you’ll see the features that will be implemented in commercial apps like Midjourney and DALLE-2 far before they get implemented.
I won’t write an entire tutorial on installing Automatic1111 because there are already some great video tutorials. I will point you to the two videos you need to get started.
I recommend watching this Automatic1111 installation video FIRST.
If you have issues with the installation, check out the Discord channel that the video creator mentions & links in the video description. They can help with installation issues. I wish I had time to help people with their issues, but the reality is I don’t. I’m still happy to field questions and talk shop via Instagram DMs!
The next step is installing the ControlNet extension.
You only need the first four minutes of this video, and you don’t need to download all of the ControlNet models he mentions. You only need to download this one scribble model for now (although if you have the hard drive space and the internet speed, I’d recommend you download all of them. Each one of them is revolutionary in the AI image creation world and I recommend you dabble with it all).
Once you have those two installed, let’s talk nitty gritty.
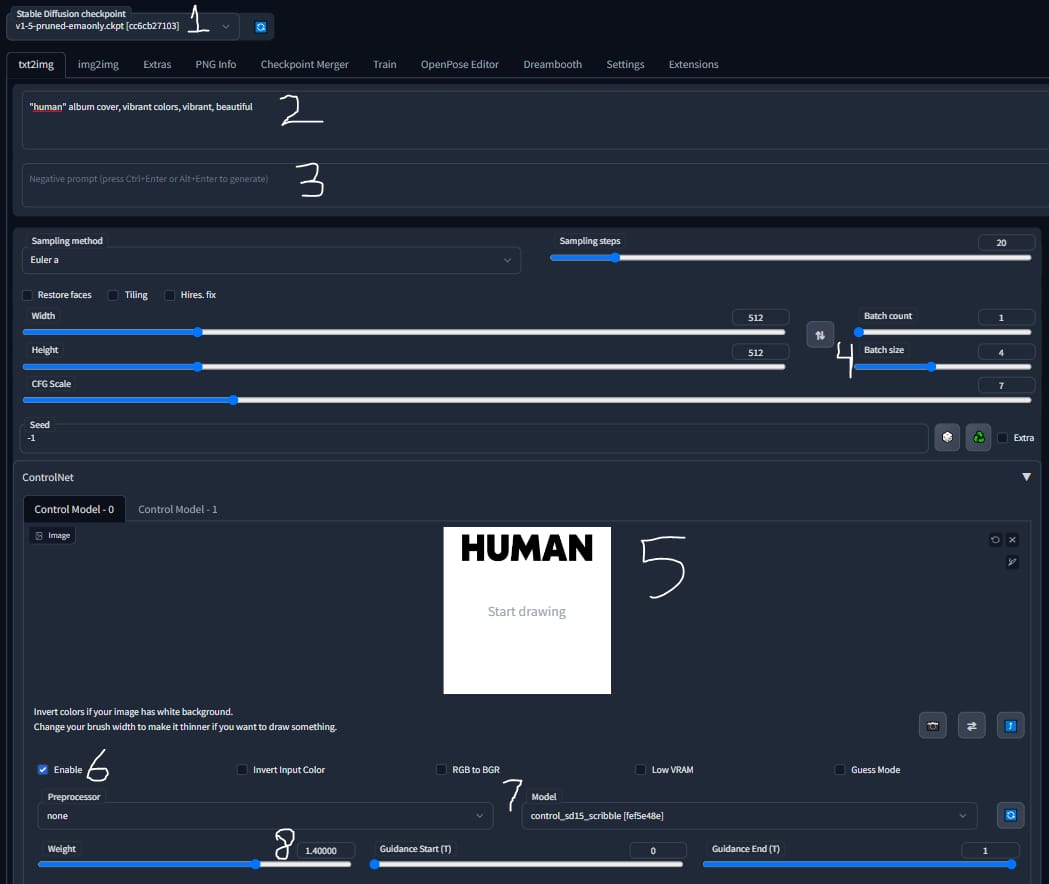
You are about to look at my exact Automatic1111 settings. I’ll guide you through them.

The left side are the settings, the right side is the output.
These aren’t the end-all-be-all of Automatic1111 & ControlNet settings. These are the settings I’ve found that fit my style & use case.
The ones that are not numbered are the default settings. You can leave those as default.

The Stable Diffusion model you downloaded
Text prompt to guide your image
Negative prompt to avoid when generating images. e.g. if you want a photograph, it may help to put “illustration, drawing, blurry” to steer the AI away from those.
Batch size: How many images you want to come out of it. When I want a bunch of different options, I’ll put Batch Size to 8 & Batch count to 4, resulting in 32 images (8x4=32 images)
Scribble image to base the image on. You can draw your own image in the program, or upload your own. I’ve had success using Photoshop/Canva to make a black & white image to give the AI. I’ve found that bold font, san-serif text works well. To start, I recommend trying a wide variety of things with the purpose of understanding how certain inputs lead to certain outputs. This should be a learning experience for you.
Don’t forget to check ENABLE on the ControlNet extension. I’ve forgotten this many times. Easy to forget. Check the box.
Also easy to forget, DON’T FORGET TO SELECT THE CORRECT CONTROLNET MODEL.
Weight is how closely the output will look compared to the input image. I believe 1.25-1.4 to be a sweet spot. Too little weight, and the output doesn’t look like English letters. Too much weight and the output looks like very bad Photoshop.
Hint: If you don’t see number 5-8, click on the drop down arrow on the left side of the ControlNet box.
Those are the basics! I encourage you to install Automatic1111 and get into experimentation mode. It’s hard for me to tell you the best use case got your life.
However, I promise I’ll continue to show you how I’m using it, in hopes you see a way it can relate to your life.
I also promise you that if you send me a picture/video in IG DMs of you using Automatic1111, I will spend some time getting to know you and your scenario so I can share further insights on how you specifically can use it.
I highly respect anyone who follows this tutorial because it shows that you’re trying to learn. Learning gets rewarded in life. I’m very busy in my day to day, but I love giving love to those who are really out here learning and are smart about their approach to AI tech.
I’m here in the Substack comments and on Instagram if you have any questions. See you next Monday at 7am EST!
If you found this helpful, please help your friends stay updated on AI and send this to them. The newsletter is three months old now, and I’m happy to say it has over 150 subscribers! A recommendation is a perfect way to say thanks for the knowledge shared and the effort it takes to share it :)